How to use anno3DP-Series / anno3DPシリーズの使い方
1. Workflow
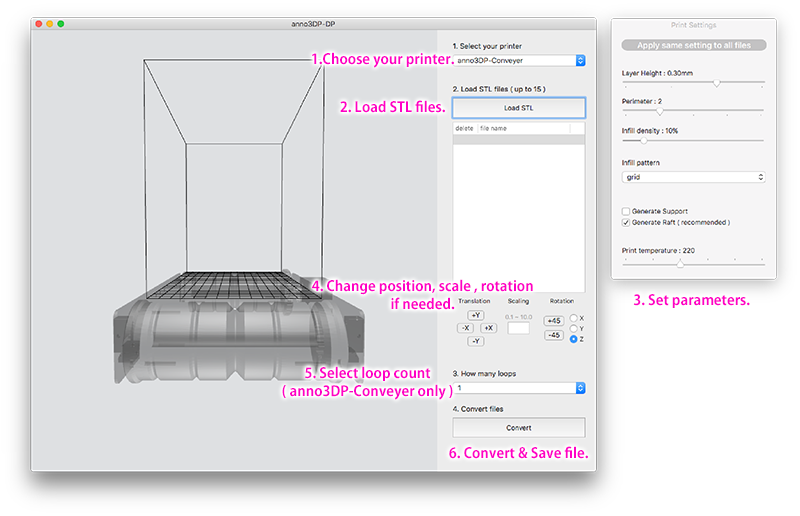
3D object have to be saved in STL file format. Launch anno3DP-DP application.
1. Choose 3Dprinter type you use.
2. Load STL files.
3. Set up paremeters.
4. If needed, change STL file's position, scale, rotation.
5. Choose the number of loop count of printing ( only in anno3DP-Conveyer ).
6. Name converted file and save the file.
7. Copy the file into SD card, insert it to 3DPrinter, choose file name to start printing.
1. 全体の流れ
3DデータをSTL形式で用意します。anno3DP-DPソフトウェアを立ち上げてください。まず、
1.使用するプリンターのタイプを選択します。
2.変換したいSTLファイルを読み込みます。
3.変換パラメータを設定します。
4.必要があれば、読み込んだSTLファイルの出力位置や大きさなどを調整します。
5.anno3DP-Conveyerを使う場合は、出力ループ数を設定します。
6.ファイル名を決めて変換・保存します。
7.変換されたファイルをSDカードに保存し、本体に移して出力を開始します。
3DデータをSTL形式で用意します。anno3DP-DPソフトウェアを立ち上げてください。まず、
1.使用するプリンターのタイプを選択します。
2.変換したいSTLファイルを読み込みます。
3.変換パラメータを設定します。
4.必要があれば、読み込んだSTLファイルの出力位置や大きさなどを調整します。
5.anno3DP-Conveyerを使う場合は、出力ループ数を設定します。
6.ファイル名を決めて変換・保存します。
7.変換されたファイルをSDカードに保存し、本体に移して出力を開始します。
2. Parameters
Layer Height : Thickness of each printing layer.
Perimeter : Thickness of outer shell.
Infill density : Density inside of outer shell.
Infill pattern : Shape inside of outer shell.
Generate Support : On/Off switch for support material.
Generate Raft : On/Off switch for basement of object.
Print temperature : Printing temperature in Celsius.
2.パラメーターについて
Layer Height : 積層ピッチを変更します。
Perimeter : 外殻の厚みを変更します。
Infill density : 中身の密度を変更します。
Infill pattern : 中身を埋める時の形状を変更します。
Generate Support : サポート材の有無を変更します。
Generate Raft : 出力時の座布団の有無を変更します。
Print temperature : 出力温度を変更します。
Layer Height : 積層ピッチを変更します。
Perimeter : 外殻の厚みを変更します。
Infill density : 中身の密度を変更します。
Infill pattern : 中身を埋める時の形状を変更します。
Generate Support : サポート材の有無を変更します。
Generate Raft : 出力時の座布団の有無を変更します。
Print temperature : 出力温度を変更します。

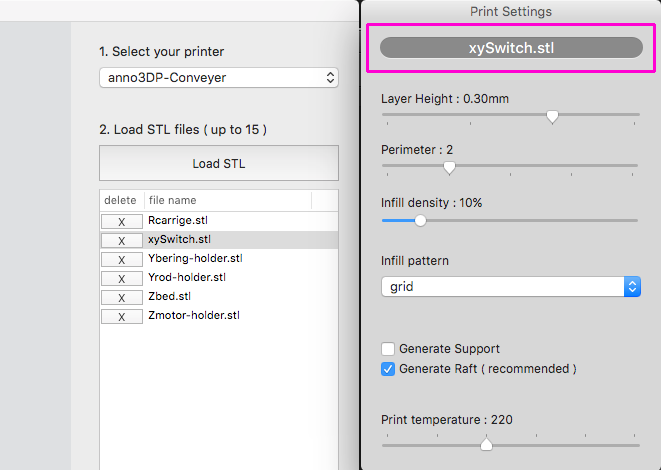
3. Set parameters for each STL file.(only in anno3DP-Conveyer)
By default, parameters are applied to all files you load. If you want to change parameters for STL file one by one, change mode by hitting button upside of setting window. then, select file's name listed in main window, change parameters.
By default, parameters are applied to all files you load. If you want to change parameters for STL file one by one, change mode by hitting button upside of setting window. then, select file's name listed in main window, change parameters.
3.パラメータを個別に設定したい時(anno3DP-Conveyerのみ)
設定されたパラメータは通常、読み込んだすべてのファイルに適用されますが、ファイル一つ一つに異なる設定をしたい場合は、セッティングウインドウ上部にあるボタンを押してください。モードが切り替わり、個別に出力パラメータを設定できるようになります。リストに表示されているファイル名を選択し、一つ一つ設定を行ってください。
設定されたパラメータは通常、読み込んだすべてのファイルに適用されますが、ファイル一つ一つに異なる設定をしたい場合は、セッティングウインドウ上部にあるボタンを押してください。モードが切り替わり、個別に出力パラメータを設定できるようになります。リストに表示されているファイル名を選択し、一つ一つ設定を行ってください。
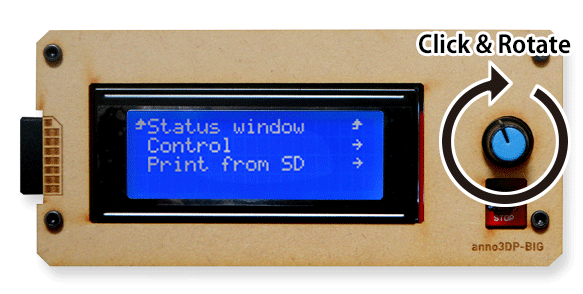
4.Print
Copy converted file into SD card, Insert the SD card into left edge of LCD screen. Select file name you want to print from LCD screen menu to start printing.
Copy converted file into SD card, Insert the SD card into left edge of LCD screen. Select file name you want to print from LCD screen menu to start printing.
4.出力
SDカードに変換ファイルをコピーしたら、3Dプリンタ本体にある液晶画面の左側にSDカードを挿入します。液晶のつまみを操作し、『Print from SD』メニューからファイル名を選んで出力を開始します。
SDカードに変換ファイルをコピーしたら、3Dプリンタ本体にある液晶画面の左側にSDカードを挿入します。液晶のつまみを操作し、『Print from SD』メニューからファイル名を選んで出力を開始します。